Monday, September 30, 2013

A Love for Grunge and the First Wendy Darling Jacket

I've always had a love for grunge.

You see, flannel was my best friend growing up. Plaid, my partner in crime. I never went anywhere without a plaid shirt whether it be flannel or not. I wore Doc Martins until they fell apart and my mom had to secretly sneak into my room and throw them out before I made a scene.

I loved the feel of chunky soles mixed with a red flannel—I felt comfortable. I felt like me.

Now at the ripe age of 10-years-old, I didn't know Kurt Cobain nor did I care about trends (well, that has stayed the same). But I still find myself leaning toward a plaid shirt and something leather or ripped whenever I want to make a statement.

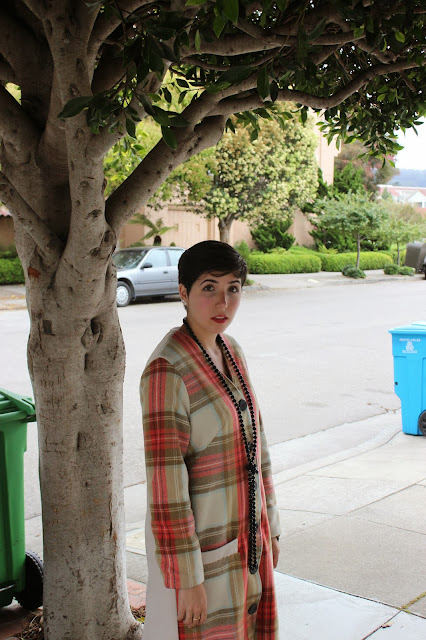
As I looked at these pictures today, I noticed there were a few things that I took inspiration from. Like this Stella McCartney jacket and although I was not aware in the moment, I think I must have subconsciously been channeling Bender from The Breakfast Club.

But, my favorite thing about this outfit and this post is that I could finally debut the jacket I made. I wanted to pair this jacket with something different, something bold. I wanted to show that a traditional tartan doesn't need to be dressy or at all preppy. When paired with different pieces such as an oversized shirt and chunky boots, it can give it that grunge look and altogether different expression.

So, although this jacket will be worn with everything from jeans to heels to dresses, I wanted to debut my creation with something different and bold.

I hope you had a wonderful Monday, my friends. And may we all thank Kurt Cobain for putting plaid on the map.


Gotta love boxy silhouettes. 


Photos taken by Brian Loftus

shirt: Free People; lace shorts: Forever 21; boots: Doc Martin's; wool coat: Wendy Darling


Sunday, September 1, 2013

Alameda Antique Fair

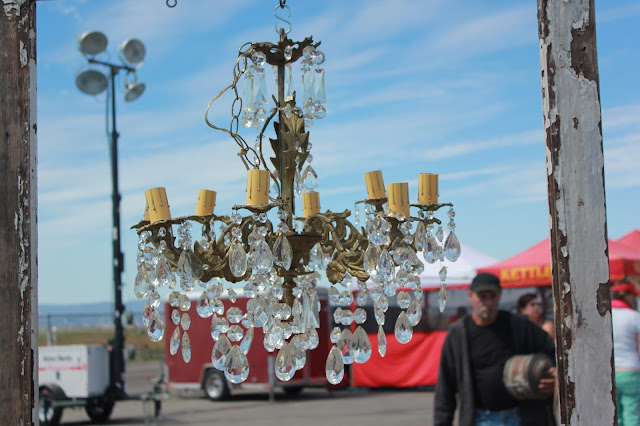
Today was an absolute magical day filled with sunburned skin, open-mouthed laughs and lots and lots of antique goodies. The first Sunday of every month, Alameda has an antique fair with 35 massive rows filled with vintage clothes, hats, postcards, chandeliers, you name it. To put it in perspective, we were there for 3 and a half hours and only got to row five...

Let's just say there were a lot of oldies but goodies.


Smiley Sirapa.


Gotta love old suitcases.


You know the magnetic words you put on your fridge and create silly sentences? Yeah, this has that beat.


The "artistic selfie" of the four of us. I have a flash for a face. 


The precious sun hat bracelet Sirapa found.

Beautiful city by the Bay.

I made away with a few perfect gems which you'll definitely be seeing in the next few blog posts and it was so nice getting to spend a day with the girls. Only 30 more days until the next antique fair...

But who's counting?

Tuesday, August 27, 2013

The Perfect Summer Pizza

As I glance up at the title, I'm reminded that summer is packing up, rubbing it's tired eyes, and getting ready for a long, long nap. It's almost Fall which means in San Francisco, it's almost summer here. We've endured the foggy, 50 degree days and nights for all of July and August and finally, some sun! Our Indian Summer has arrived.

And to all my loved ones on the East Coast or wherever you may be, think of this pizza as a toast to Summer as you give her a "sleep tight" nod and greet Fall with a big hug for an old friend.

The reason I really like this pizza is that it has no cheese which for a lactose intolerant gal like me, makes my tummy extremely happy. On top of that, it's topped (pun intended) with fresh, delicious and healthy Ratatouille.


photo source: http://www.cafejohnsonia.com/

Alright, alright. There is one more pretty brilliant thing about this pizza. It's gluten free. I know, I know...I'll say it again for those of us in disbelief. Deliciously. Gluten. Free. And the good news continues...you can absolutely make this non-gluten free. Pizza for everyone!

Making pizzas always reminds me of my Grandma who I used to make sausage pizza with when I was younger. Now, Bri and I have date nights where we pull whatever we have in the fridge and dump it on our pizza like goat cheese (tummy approved), black berries, arugula...and the list goes on.

Oh but that, my friends, is a whole other blog post.

Tuesday, August 20, 2013

A Jumper and a Circa '67 Baby Blue Beatle

This baby blue Volkswagen Beatle has been parked down the street from us for quite some time now. It makes me nostalgic and reminds me of college when Brian had a baby blue Beatle and I would hold on to the back fender (for dear life) as he pulled me on my long board (sorry, Mom!).

So today, we decided to cease the opportunity and pose with the beaut. I've got to admit, these are some of my favorite photos.

This snazzy little jumper I'm wearing was something I picked up a few weeks ago in a boutique in Sausalito. There's a funny story behind it, as there is with all great finds: I bought it and then went and laid in the grass with my man on the beautiful, sunny day and my poor little jumper ran off with the spoon (or maybe the fork...). It wasn't until we got back to the car that I realized the bag must've blown away. Still, I loved how playful and different it was so I went back and bought it again. It was definitely worth it. And this time, she decided to stay.


Flowers just make everything prettier. 


Goodbye, Beatle! We'll be back! xx
Photos by: Brian Loftus

shirt: Urban Outfitters (old):: jumper: Sans Souci:: heels: Michael Kors:: bag: Tory Burch (old):: earrings: Stella & Dot:: leather jacket: Lucky Brand

Thursday, August 1, 2013

Better Than Sex Cake

Don't let the title throw you off.... it may just be true.

Caramel, cool whip, Devil's Food Cake...I mean *come on*! That sounds just about better than anything to me. I'm easily amused.


photo source: Brown Eyed Baker

Yield: 10-12 Servings
Prep time: 1 hour
Cook Time: 30 minutes
Total Time: 1 hour 30 minutes


Ingredients:
1 box devil's food cake mix
1 (14-ounce) can sweetened condensed milk
1 (12-ounce) jar caramel ice cream topping
8 ounces Cool Whip
½-1 cup Heath toffee bits

Directions:
1. Bake the cake according to the directions on the box.
2. Remove the cake from the oven and immediately poke holes all over the top using either the bottom of a wooden spoon, a skewer or a fork.
3. In a medium bowl, stir together the sweetened condensed milk and caramel sauce, then slowly drizzle the mixture all over the cake. Allow the cake to cool completely at room temperature, then refrigerate for at least 1 hour.
4. Spread the Cool Whip over the top of the cake, top with the Heath toffee bits and refrigerate again for 1 hour. Serve cold and refrigerate any leftovers.

With the heath bar crumbles on top of the cool whip topping, it will put you over the top. Just like something else I know... dig in!

PS: You can thank Brown Eyed Baker for this delicious recipe...and any innuendos. Okay, okay, the innuendos are all mine. I take full responsibility.

Tuesday, July 16, 2013

"Should": Your New Nemesis

photo source: http://qsprn.com

As I read this, I am "shoulding" myself. "I should have woken up earlier so that I could've gotten more work done," "I should have gotten more work done so that I could go to yoga tonight," "I should have cleaned the bedroom instead of watching TV"...and the list goes on.

Unfortunately, I find myself doing this quite often. When reflecting on my day, I usually can pick out three things I should've done or shouldn't have done. Rarely is there a day where I don't wish—or think—that I should've done more.

I love this quote because it reminds me to be content with everything I'm able to accomplish—or not accomplish—throughout the day. Finding balance is one thing that most everyone struggles with, but with moderation comes contentment and with contentment comes the ability to stop judging ourselves.

And when looking back, the things I didn't get to were put aside for more important things like spending time with my boyfriend before he goes to work, talking to my Mom on my phone, or meditating.

So going forward, remember to love yourself, even when you don't think you're doing well enough. You are. I promise. And enjoying life's moments is a damn good excuse to shirk your responsibilities from time to time.

Maybe I "should" not be eating these delicious M&M cookies right now, but to be honest, I don't give a damn. And that right there, my friends, is freeing.

Saturday, July 13, 2013

Black & Blue

This is one of my trusty shirts. I've had it for years and have worn it 100 different ways. It's soft, comfy, and my go-to shirt when I don't know what else to wear. These pants are pretty much the same way. They go with just about everything and are the best, especially when I've eaten too much In N' Out Burgers (happens more than you'd think!) So I figured, why not put them together? If there's a will, there's a way...


shirt: Free People:: pants: J.Crew:: jean vest: Forever 21:: shoes: Tom's:: purse: Coach:: necklace, earrings, cocktail ring, bracelet: Stella & Dot:: bracelet: Alex & Ani:: glasses: Michael Kors

photos by: Brian Loftus

Hope you're all having a beautiful weekend! xx

Friday, July 12, 2013

Friday Findings: The Loft Life

Yesterday in class, one of my teachers asked us all a very interesting question that was extremely hard for me to answer: What one product do you wish you could have?

Me? You mean what would I want if I could ask a Genie for one product in the world? I was speechless. I finally answered and said anything by Dries Van Noten, but after I thought about it for a little, I realized what it was that I'd really love.

A loft.

I mean who doesn't want to live in a exposed brick, hip, unique loft? Whether it be in New York City or in Paris. So here is an ode to a dream maybe one day come true. Which loft do you like best?


Wednesday, July 10, 2013

Three Unique Desserts to Try Before Summer is Over

Mmm, summer desserts. There's something so blissful about ice cream, popsicles, and anything else that helps to bring down the delightful but sometimes overwhelming summer heat. If you're on board with the cold treats that fills the plate (and your belly) at almost every meal in the summer, then boy are you in for a treat.

These three desserts are unlike your delicious yet common chocolate ice cream cone. They're just as delectable, just as desirable and a whole lot of cool (pun intended). Dig in and read on...you won't regret it. And neither will your stomach.

Avocado & Pear Pop:

photo source: The Spunky Coconut

Alright, so confession: these pops were originally made by creative and clever blogger The Spunky Coconut for her baby who is teething. But hey, they sound absolutely delicious and too interesting to pass off. Not to mention, have you ever eaten baby food?! It's quite tasty. I'll stand by that declaration.

Puree:
2 avocados
2 pears (skin removed)

1. Fill the molds half way, insert sticks, and froze.
2. Soak in hot water for a minute to remove the pops from the mold.
3. Makes about six.

**If you aren't digging the Avocado and Pear combo, try her Nectarine, Kiwi, Banana pop recipe here, or her Kiwi, Apricot and Mango pops here


Layered Oreo & Nutella Popsicles:

photo source: Pinterest

There isn't a lot that needs to be said about these babies. There's Nutella. There are Oreo's. Some whipped cream, cool whip, Hazelnuts and sugar. And they take about 15 minutes to make. I think we're done here.

What you’ll need for the Oreo Popsicle Mix:
- 6-10 Crushed Oreo’s
- 2/3 cup of heavy whipping cream
- 1 Cup of Cool Whipped Topping (thawed)
- 1 tbs of sugar
- 1 tsp of vanilla
- Oreo Crumbs for garnish.
- Shot Glasses, any cup, or popsicle mold.
- Popsicle Sticks

Directions: In a large bowl add heavy whipping cream, whipped cream, sugar, and crushed Oreos and mix well. Pour the mix into the shot glass, add Oreo crumbs on top and freeze for about hr then add the popsicle sticks. Freeze for another two hours.  To remove the popsicles from glass/mold.. add warm water to a small bowl and insert the popsicles to softened for 1-6 seconds.
Makes about 12-16 popsicles depending on the cup size.

To Layer: 
Layer ONE- Oreo Popsicle Mix
Layer TWO – Chopped Hazelnuts
Layer THREE- Melted Nutella
Layer FOUR- Oreo Popsicle Mix
Layer FIVE – Chopped Hazelnuts
Layer SIX – Melted Nutella
Layer SEVEN – Oreo Popsicle Mix
Layer EIGHT – Oreo Crumbs

**Thank blogger, Little Inspiration for any chocolate addiction that may occur.


Creme Brulee Ice Cream:

 photo source: Cafe Johnsonia

When you're young and you go through the phase of playing with fire, your parents (and surrounding friends, strangers, etc) get verrry nervous. Well pyros, here is your chance to prove them that all that practice you had with lighting everything you could when you were younger paid off in the form of mouth-watering, delectable ice cream. Go crazy with the torch, my friends. The only result will be caramel and hugs from your loved ones that you serve this to. As blogger Cafe Johnsonia tells us when she eats her award-winning (in our book) recipe: "It's worth every single calorie."

Ingredients:
2 cups very cold heavy cream
1 cup whole milk
10 egg yolks
3/4 cup sugar
2 tsp. vanilla or 1 vanilla bean, split
pinch salt
10-12 tsp. raw sugar
equipment needed: culinary torch

Instructions:
Beat egg yolks, sugar and salt together until thick and light in color.  Heat milk with vanilla bean, if using, until very hot.  Add to the eggs and sugar in a slow, steady stream.  Pour back into pan and cook over medium-low heat until it reaches 170-180 degrees F.  (Be really careful not to let it curdle!)  Pour through a sieve into a clean bowl.  Add the cold cream and vanilla extract, if using.
Chill for at least 3 hours or overnight.  Or to speed up the chilling process, use an ice water bath.*  Churn in an ice cream  maker according to manufacturer directions.  Divide the ice cream between 10-12 small freezer-proof bowls or ramekins, leaving a little space at the top.  Press a bit of waxed paper on the surface to make it smooth and flat.  Transfer to the freezer.

To serve:
Remove ramekins from the freezer about 10 minutes before serving and allow to soften a bit at room temperature.

To caramelize the sugar:
Sprinkle top of each ramekin of ice cream with 1 tsp. raw sugar.  Use a torch to caramelize the sugar.  Serve.

**You can prepare and ice water bath buy using two nesting bowls. Just make sure that the bowl holding the ice water is large enough to accommodate the bowl with the custard. You want most of the custard bowl to be submerged in ice water so the custard can cool sufficiently. Or you could also fill your kitchen sink with ice and water.

I like to use a large glass bowl to hold the ice and water, and my stainless steel Kitchenaid mixer bowl to hold the custard. The metal gets much colder, much faster than glass.
The colder you let the custard get, the faster it will freeze and the smoother it will be.